What Is Full Bleed Printing?
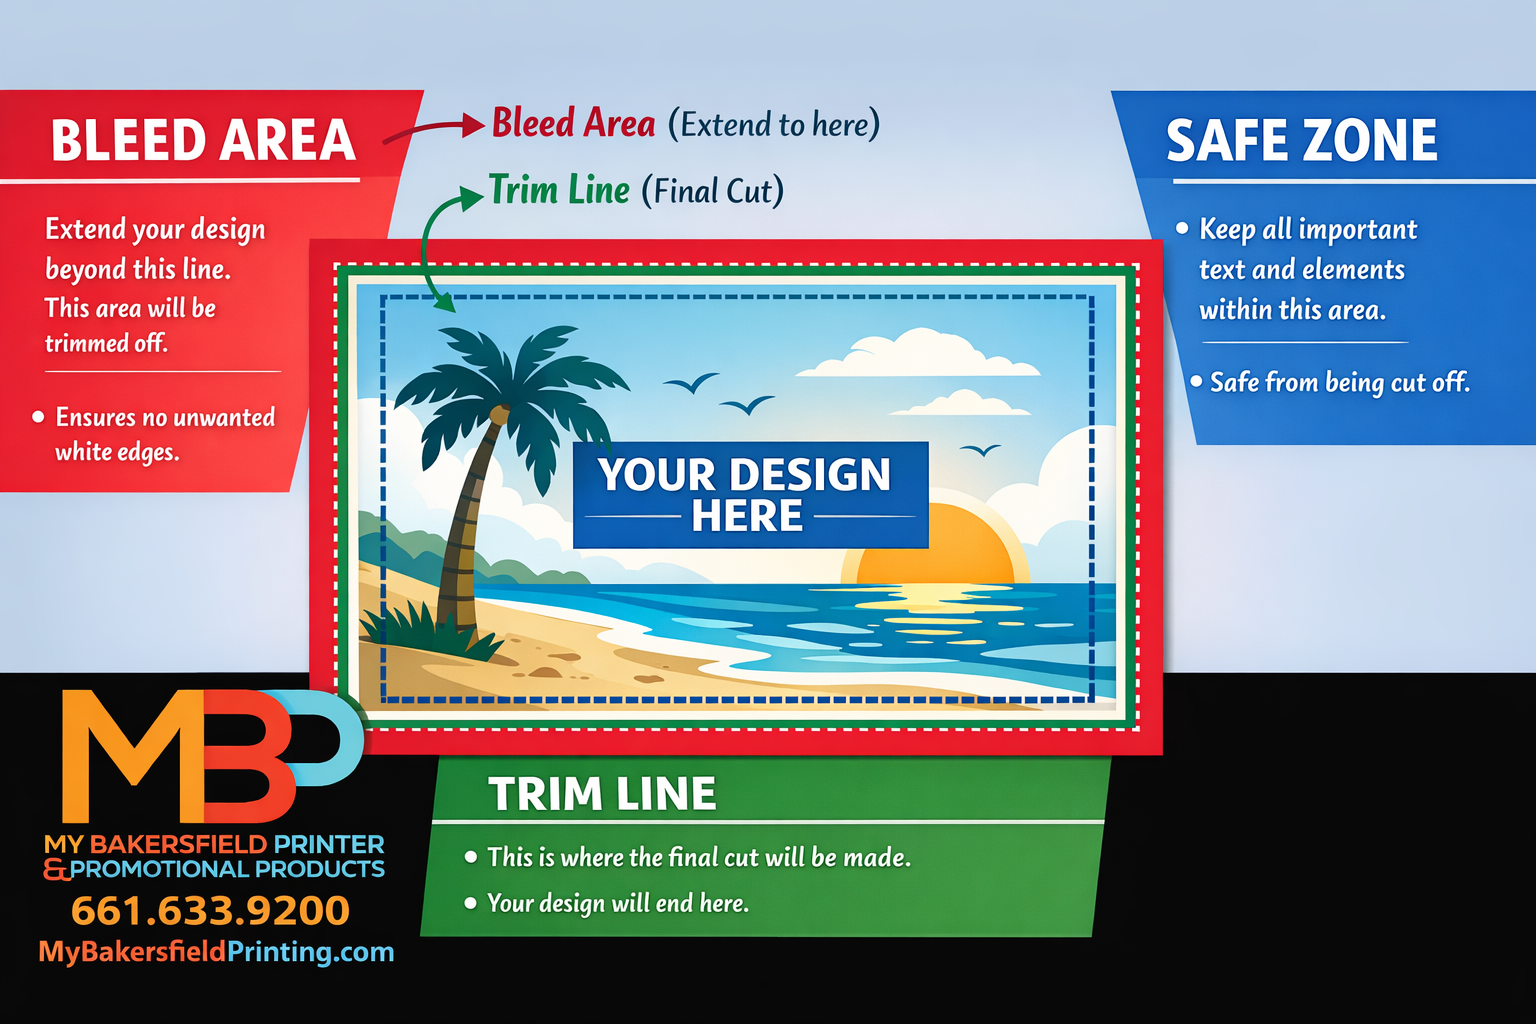
- Trim Line: The final size of the document after the last cut is made.
- Safety: The safe area or inner margin where you keep all important elements (such as logos and words, images, etc) to prevent them from being trimmed off. This margin should be at least 1/8” inside the edge or .125 of the trim line.
- Borders: All Framed Borders must be at least ¼” from the trim line or 3/8” from the bleed line.
Understanding Bleed, Trim & Safe Zone: A Simple Guide for Perfect Print Results
When you’re designing a postcard, flyer, or any printed marketing piece, a great design isn’t just about good visuals — it’s also about preparing your file so it prints accurately and cleanly. That’s where bleed, trim, and safe zone come into play.
At their core, these three concepts help ensure your printed piece looks exactly the way you intended once it comes off the press. Let’s break them down in clear, easy-to-understand terms.
📏 What Is “Trim”? — The Finished Size of Your Piece
The trim line refers to the final size of your printed item after it’s been cut. Think of this as the finished edge of your postcard or flyer. After printing, the press will cut the sheet down to this size using a guillotine or cutting tool.
This is the most important reference because your whole design is built around it — the trim size tells you exactly what size your finished piece will be when it reaches your customer’s hands.
🎨 What Is “Bleed”? — Printing All the Way to the Edge
Most home printers can’t print right up to the edge of a sheet of paper — and commercial printers face the same limitation unless you prepare for it. That’s where bleed comes in.
Bleed is extra artwork that extends beyond the trim line into a little buffer zone. Printers use this extra area to accommodate small variations in cutting. If your background color, photo, or graphic only goes to the trim line and the cut shifts even slightly, you can end up with unwanted white borders on the edge of your final print.
For most print jobs, a standard bleed amount is about 0.125″ (3 mm) on all sides — but this can vary depending on your printer’s requirements.
Bottom line: Always extend backgrounds and edge-to-edge graphics into the bleed area so your finished piece prints cleanly to the edge.
✋ What Is the “Safe Zone”? — Protecting Your Important Content
Inside the trim line is the safe zone. This is the area you definitely want text, logos, phone numbers, and other key content to stay within.
Because trimming isn’t 100% perfect (remember that slight variance we mentioned?), any elements placed right up at the trim edge could risk being cut off or looking uneven.
A good rule of thumb is to keep all important content at least 0.125″ (3 mm) inside the trim edge — and even more if your design is complex or includes rounded corners.
Quick Recap: Why These Matter
| Term | What It Means | Why It’s Important |
|---|---|---|
| Bleed | Artwork that extends past the trim | Prevents white edges if cutting shifts |
| Trim | Where the printed piece is cut | Determines the final size customers will see |
| Safe Zone | Margin inside the trim | Keeps logos, text, and critical elements from being cut |
Pro Tips for Designers
✅ Always include bleed in your file if your design goes to the edge.
✅ Keep text and important visuals well inside the safe zone.
✅ When exporting your final PDF, check that bleed settings are enabled.
✅ Use professional design tools (like Adobe Illustrator, InDesign, or approved templates) that let you set bleed and trim guides at the start.
By understanding and applying bleed, trim, and safe zone in your print design, you’ll avoid common printing issues and ensure your marketing pieces — whether postcards, flyers, or brochures — look sharp and professional from one edge to the other.
Need help setting up your design the right way? That’s exactly what we do. Contact us or upload your file, and we’ll make sure it’s print-ready! 💼🖨️